When I first got into droning on my Mavic Pro, the concept of editing the camera settings was very alien to me and something I was afraid to play around with, but more and more exploration into what I could do with this drone eventually led me to experiment with this and I’m glad I did.
Now before I give you the tutorial to use on the Mavic Pro camera, I want to give praise and credit for the person who helped me figure this out and this is a man who on YouTube goes under the name “Captain Drone”. He does great videos and reviews on droning and I highly recommend his channel.
And here’s the video from the guy:
Anyway, let me explain the idea my way:
The camera on the Mavic Pro is fantastic. When you first get it and turn it on, it will set itself to auto mode in which it will determine the best settings (parameters) to use given the conditions that it’s in.
The parameters will set what is known as the ISO and shutter speed and white balance and after that, the specs of the camera itself (12 MP @ 30 fps or however much you set it to) will fill in the rest. Thus you will have a picture transmitted on your phone/SD card.
In my experience and opinion, letting the drone’s camera determine things on auto is good, but changing it to the parameters I will show you will make it better. Let me put it this way:
The auto in my personal opinion is a B+ or A- in terms of getting it right (it’s also circumstantial), but the settings change will make it an A and even A+.
Here is an example:

Note: There is a formula to get this right.
There are no “universal settings”, there is only the formula which will determine them. You see, the thing is, you may be filming in different areas:
In a light area, in a dark area, outside when the sun is shining, and other times when it’s cloudy, or it could be in nature and there’s just a plethora of circumstances where the camera will auto set to determine the right ISO, shutter speed and other parameters for the place you’re in, meaning the numbers will be different each time.
So if you follow the formula, the camera parameters will adjust properly for the area you’re in to make it stand out as best as possible, that’s the point I am making here…
So what is the formula? There’s 2, the first is for the video.
There is only 1 thing you need to set here and that is…the white balance, meaning that depending on whatever area you’re in, if you have anything white on the screen, and adjust the video settings to make the white color as white as possible, that is all you’ll need to do and after that, the remainder of the colors will adjust accordingly and it will make the video image better.
I recommend keeping a sheet of white paper on you to use as reference, because if you’re in an area where are no white colors available, this will be difficult to do and you’ll have to guess it. Keeping a sheet of white paper (or any white prop) will be good for reference.
Here is how to set it up:
1. The first step is to turn on the drone/remote, connect it to your camera and get an image transmitted to your phone. Then click the yellow circle I have shown below:

2. This will open up a menu. Touch the middle icon (it is the video icon). Then select the icon I have shown below:

3. Ok so the key in this step is to select custom:

4. This is where a white sheet of paper will come in handy. Use it to properly choose which K (kelvin) number is best to select. As long as the white sheet (or whatever you use as a white reference) looks as white as possible, that is the ideal K number to keep.
5. From there, the video is manually formatted to take the best looking video, or at least better than what the auto would have recorded. That part is done.
Next is the photo.
Here there are 2 parameters that need to be set to get photos looking awesome and that is the shutter speed and ISO. Luckily, the auto part gets the ISO right, so all you really need to worry about is the shutter speed…
1) Make sure the camera is initially set to auto. If you’re unsure, or maybe you played around with it before and you want the initial settings done right, simply reset the camera.
Here is how to reset it the quick way (literally a few seconds):

2) Go into the picture mode, look at the ISO and shutter speed, those are your central numbers, remember them, because you will have to select them. Now touch manual:

3) Once you hit manual, odds are the screen will turn “dark”, this is because the ISO and shutter speed will be set low, so there will be little light let in, thus messing up the image. Worry not, simply change the ISO and shutter speed back to where it was on auto:

Now in my example, the ISO chosen by the camera was 800, so I set it back to that. In your case, it may be different to set it to whatever it says it is in your situation, the same for shutter speed, which is my case was 30.
4) Now the key to making the perfect picture is this:
Leave the ISO as is. Focus on the shutter speed and move it to the right or left from the original one it was set by auto. In my case, it was 30, and I dragged it to 40 and higher to see how the picture would change.

This is the key to this whole section. Remember, I said the Mavic camera gets it close, but through THIS particular step, you get it to the right area by minimally shifting the shutter speed.
5) Now you may have to take several different pictures with different shutter speeds, but make sure they are close to the one that was picked by the auto version, because the one you want (the perfect one) will be close to the auto.
Here is an example of 2 pictures I took of a beach. One was auto and one was set manually the way I mentioned (and showed the video off):
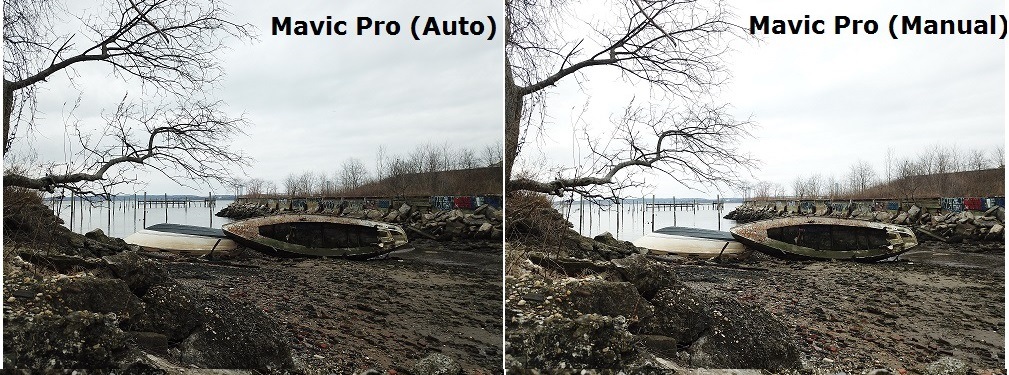

So here are specific details on the image above:
I have found that this strategy is good on days when there is low light as setting the ISO higher will help increase the details in darker areas. If you look at the auto part, the beach in particular is a bit difficult to make out, whereas in the manual option, you can see more color and details in the sand.
Note: These numbers change as your environment changes.
If you’re outside during a sunny day, you will get a different ISO number and different number for shutter speed and for that matter, if you’re filming in a different area, you will always get different numbers, but remember, it’s the formula you’re looking at.
Let the auto figure out the closest to perfect settings, then adjust it from there. Try this a few times on your own and even if you get lost, you can ALWAYS reset the camera.
On sunny days, I’d actually do the opposite in terms of setting the ISO to lower numbers as too much brightness might make the details blend in together, but making it darker will help them stand out.
Why not just use ND filters?
When it comes to the Mavic Pro, I heard some questionable things about them in terms of how they affect the gimbal so I elected to not use them. While they are good for the picture quality, in all honestly, it’s not like they’re going to make the image sharper or better, the camera has a limit on how well it shoots and the formula I gave you now will let you make that perfect (or close to perfect) image/video without risking the gimbal breaking down.
What about sharpness? Do I edit that?
No I leave that as is. The auto comes close enough to figure out the last tiny detail via the shutter speed to make the image good enough for me and in all honesty, I’ve shot amazing images through the auto alone, but you can do more if you just make this tiny edit to the video/photo.
Do you have a custom/manual tutorial you prefer?
I’d like to hear your formula for creating the best camera parameters for your Mavic Pro, especially if they differ from the one I used because I’d love to try it as well and add to this article to give people more options. Again, I linked the YouTube video of the person I learned this from and I recommend you check it out too, but I’ve had some great results with the above formula! Let me know if they also made your videos/images look better 🙂
I am actually a happy user of one of the drones you recommended earlier in your posts and I was also afraid to touch any video or photo setting on my drone. My settings look similar to yours and I actually tried today to play with the white balance. As I was shooting outside and it was quite sunny so I also changed my ISO into 100 and oh, man! it made so big difference on the quality of the pictures I made! I am not sure why I never played with these options before?! I guess you need that kind of a push to start doing things that you were supposed to do before!
There is a setting in the same area as where you change the white balance, but it is labeled “Sunny”, so you can try playing with that, but a custom adjustment of the white balance is the ideal option to go for. Did you manually set the ISO to 100 or was the automatic setting set to that? Just curious, as typically, a lower ISO happens in lighter areas vs a higher one in darker areas.
Well, this is a post that’s certainly right up my alley – not only is it about drones, but it’s also about my favorite, the Mavic! Every time I think I know everything there is to know about the Mavic’s camera settings, I read a great post like yours and learn a little bit more. Your tweaks to the manual shutter speed and ISO are great tips. I never thought about approaching it this way. So, thanks!
I’ve DEFINITELY bookmarked your site and I look forward to reading more.
– Jason
Thanks Jason, the good news is that with the way DJI makes drones, there’s SO much room for improvising, and not just with the camera settings, but also with flight modes, gimbal/camera motions and other flight modes that can really suite individual personalities/tastes and furthermore, if anyone has issues with the changes they make on the Mavic, they can ALWAYS reset them and never have to worry about screwing up the drone.